Getting Started With cnet
Jeff Ondich, Carleton College, Northfield, MN 55057, jondich@carleton.edu
Links to files mentioned below:
- BOAPDLL
- boapdll.c
- boapdll.h
- completehello.c
- HELLO
- hello.c
- HOTPOTATO
- hotpotato.c
- hotpotato.h
- STOPANDWAIT
- stopandwait.c
- stopandwait.h
1. Introduction
When
you want to learn a new algorithm, there are lots of things to do. You can read about it, talk about it, and
try out a few examples by hand. But the
real test of your understanding comes from turning the algorithm into a working
computer program.
Unfortunately,
many low-level network algorithms present a problem. To test them on a real network would be an enormous undertaking,
possibly involving the modification of operating systems, rewriting ROM on
various devices, etc. And even if you
managed to do all that, testing your algorithm under a wide range of network
conditions would be very difficult.
Fortunately,
there is an alternative. You can use a
network simulator—software that replicates the behavior of a real network. Cnet
is a network simulator designed to help you learn about the algorithmic
structure of computer networks by implementing network algorithms yourself.
This
introduction to cnet will guide you
through a few short examples of cnet
programming, showing you along the way most of the commonly used cnet features.
1.1
Where
cnet came from, and where it will run
Written
and maintained by Professor Chris McDonald of the University of Western
Australia, cnet currently runs on
several forms of UNIX: Linux (ELF
only), DEC-OSF/1 (v4.0), SunOS 4.1.x, Solaris 2.x, and SGI IRIX-5. To obtain cnet, its installation instructions, its
documentation, and its source code, go to http://www.cs.uwa.edu.au/cnet/.
At
present, there are no versions of cnet for
Windows or the MacOS.
For
the record, Professor McDonald does not give out sample solutions to students.
1.2
Prerequisites
To make sense of the rest of Getting Started With cnet, you should be familiar with the C programming language, including the output functions printf and fprintf. You should also have at least a beginning understanding of the OSI reference model (section 2.2 of William Stallings’ Data & Computer Communications, sixth edition), data link control (chapter 7), and routing in packet-switched networks (sections 10.2 and 16.1).
1.3
Suggestions?
If
you have comments about this guide to cnet,
please contact Jeff Ondich at jondich@carleton.edu or Department of
Mathematics and Computer Science, Carleton College, Northfield, MN 55057.
2.
An overview of cnet
Cnet is organized around the OSI
reference model’s idea of layering. Cnet simulates the application layer and
the physical layer of the OSI seven-layer stack. You are responsible for writing code for the intermediate layers.
Cnet simulates each node’s
application layer by generating messages intended for delivery at other
nodes. When a node’s application layer
has a message ready, it calls one of the functions that you have written. Your code’s job is to deliver all messages
to their destination nodes’ application layers, uncorrupted and in order. The trick is that you can only move messages
from node to node by calling functions in cnet’s
physical layer, and cnet’s physical
layer is designed to corrupt and lose frames just like a real physical network
would.
Communication
between layers is accomplished through an event-based programming system. The cnet
simulator generates various kinds of events, such as the “node is booting up”
event (associated with the defined constant EV_REBOOT) or the “message is ready
to come down from above” event (EV_APPLICATIONREADY). Your protocol implementation will consist largely of global data
structures and a collection of functions called event handlers. You tell cnet that you want certain functions to
be called whenever certain events take place, and arrange your code to do all
its work in response to those events.
Here
are the steps you take to implement your protocol:
·
Describe
an example network by creating a topology
file. A topology file is a text
file that identifies the network’s nodes (that
is, the hosts and routers in the network) and the links between them.
·
Write
a function called reboot_node to
respond to the EV_REBOOT type of event.
All cnet programs require a reboot_node function, which is
responsible for initializing each node’s data structures and registering event
handlers (that is, telling cnet which
events you want to respond to, and which functions should be called for each
type of event).
·
Write
the event handlers themselves.
Once
you complete the above steps, you launch cnet
with your topology file and event handlers as input, causing the following
sequence of events:
·
Cnet compiles your code. The
compiler may generate error messages and warnings in the usual way.
·
If
the compilation succeeds, cnet starts
the simulation. Based on settings
specified in your topology file (or on default values), cnet generates a sequence of events, such as:
·
A
node starts up (EV_REBOOT)
·
A
node’s application layer generates a message it wants sent to a specified
destination node (EV_APPLICATIONREADY)
·
A
node’s physical layer receives a frame from an adjacent node
(EV_PHYSICAL_READY)
·
A
timer expires (EV_TIMER1, EV_TIMER2,…, or EV_TIMER10)
If you have written and registered an event handler
for a particular kind of event, your handler will be called by cnet whenever the corresponding event
occurs.
·
If
you have requested it to do so in the topology file, cnet will introduce errors into the network. For example, your code may send a frame from
one node to a neighboring node using the function CNET_write_physical, but that frame may or may not arrive intact at
its destination.
·
Cnet collects statistics during
the simulation. For example, it keeps
track of how many frames get sent across links between adjacent nodes, how many
frames are received by those nodes, how many messages are generated by the
application layers of the nodes, how many messages are correctly received by
the destination application layers, and so on.
Because
you will write only one version of reboot_node, it’s easy to think that all
nodes must behave identically. In fact,
cnet gives each node its own copies
of all global and static variables, including a built-in global struct called nodeinfo. By examining the fields in nodeinfo,
you can make your event handlers behave differently for different nodes. You can even write separate event handlers
for the same event type on different nodes by having reboot_node call CNET_set_handler
differently, depending on the value of nodeinfo.nodenumber.
3.
Example:
Hello, world
The
first order of business is to write the smallest possible output-producing cnet program. This requires us to create a topology file to describe our
network, and a C language source file containing the function reboot_node.
3.1
The topology file
For
this example, we’ll use a network of three nodes. Here’s our topology file HELLO:
compile = "hello.c"
host Minneapolis
{
link to Madison
}
host DesMoines
{
south of Minneapolis
link to Minneapolis
}
host Madison
{
east of Minneapolis
link to Minneapolis
}
You use host to create and name a node, and link to create a connection from one node to another. Compile allows you to specify which source file or files contain your protocol implementation. East of and south of (along with their many friends north of, west of, north west of, etc.) tell cnet where to draw the nodes’ icons on screen.
For
further details on the many topology file options, see the official cnet documentation.
3.2
The protocol source file
Just as every C/C++ program needs a main, so every cnet program needs a reboot_node. When the simulator starts running, it calls each node’s copy of reboot_node. In more sophisticated situations, if the node attributes nodemtbf (mtbf = mean time between failures) and nodemttr (mttr = mean time to repair) are set, then each node will crash now and then, requiring the simulation to call reboot_node again when the node is ready to rejoin the network. For our example, however, each node’s copy of reboot_node will be called exactly once at the start of the simulation.
Here
is our simple protocol implementation, [hello.c].
#include <cnet.h>
void reboot_node( CnetEvent event, CnetTimer timer, CnetData data )
{
printf( "Hello from node '%s'.\n", nodeinfo.nodename );
}
The
function reboot_node is the event
handler for the EV_REBOOT type of event.
All cnet event handlers take
the same three types of parameters. For
reboot_node, the event parameter will be equal to EV_REBOOT, and timer and data can be safely
ignored. Event handler parameters will
be discussed in more detail below.
The
global variable nodeinfo is of type CnetNodeinfo (described in cnet.h and in the official cnet documentation). Just as each node has a complete set of the
global variables declared in your protocol implementation, each node also has
its own copy of nodeinfo. Thus, whenever a particular node’s copy of reboot_node is called, that node’s name
will be used in the printf call
above.
3.3 Running the simulation
Once you have saved HELLO and [hello.c] in your account, you are ready to run this tiny simulation. While in the directory where HELLO and [hello.c] are stored, execute the command:
cnet
HELLO
Cnet
will parse the topology file, compile [hello.c] as directed by the compile
statement, link the resulting object file together with the cnet simulation code, and then display a
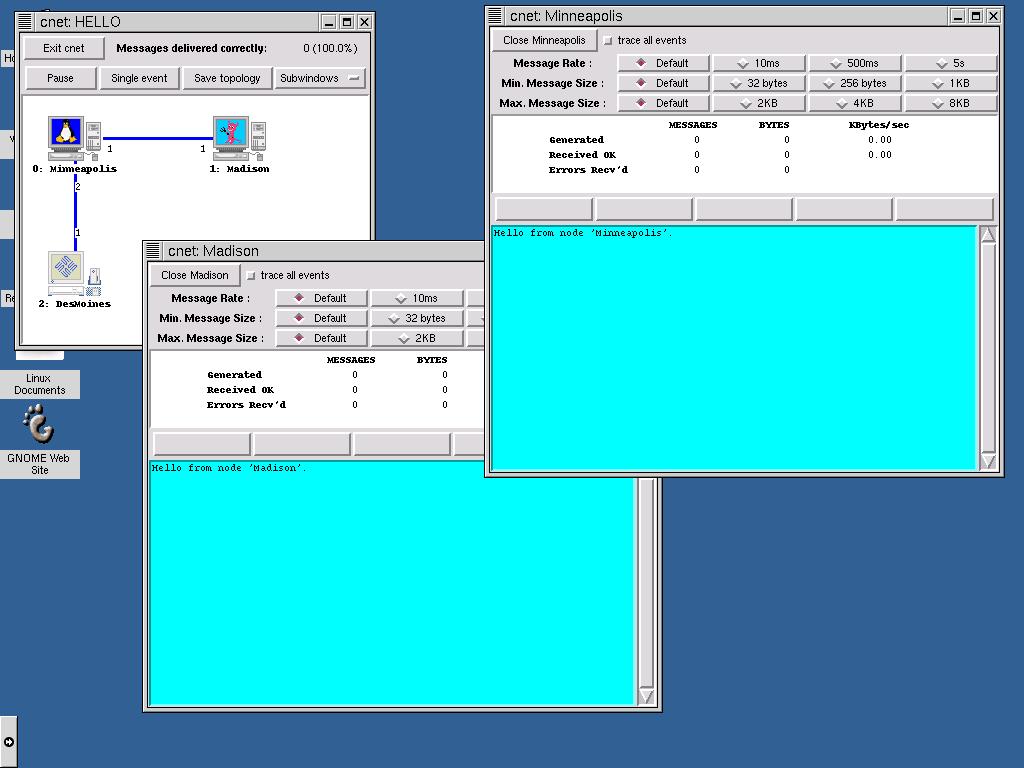
window showing the three nodes in our network.
If you click on one of the nodes’ icons, a window representing the state
of affairs at that node will open. Here
is how it might look with the Minneapolis and Madison windows open.
If
you click on the Run button in the
network window, the simulation will begin.
The printf greeting in reboot_node will appear in each open
node window. Try it.
3.4 Adding timers
Many
network protocols use timers. We will
now add to our [hello.c] to force each node to print a greeting every five
seconds. To do this, we will need to
create an event handler for the timer event type EV_TIMER1. Replace our previous [hello.c] with the following:
#include <cnet.h>
void on_timer( CnetEvent event,
CnetTimer timer, CnetData data )
{
printf( "Hello again from node
'%s'.\n", nodeinfo.nodename );
CNET_start_timer( EV_TIMER1, 5000, 0 );
}
void reboot_node( CnetEvent event,
CnetTimer timer, CnetData data )
{
printf( "Hello from node
'%s'.\n", nodeinfo.nodename );
CHECK(
CNET_set_handler( EV_TIMER1, on_timer, 0 ) );
CNET_start_timer(
EV_TIMER1, 5000, 0 );
}
After
you have tried this new program, take a look at the code, and note the
following:
·
In
the new reboot_node, we have called CNET_set_handler to tell cnet that whenever an EV_TIMER1 event
occurs at a particular node, that node’s copy of the event handler on_timer should be called.
·
We
have also used CNET_start_timer to
set a timer to go off in 5000 milliseconds—that is, five seconds later. Note that we are ignoring the timer ID
returned by CNET_start_timer. Normally, we would keep a global copy of
each timer ID, but in this program, no node ever has more than one timer
running at a time, so there is no need to compare an expired timer’s ID to a
stored ID.
Watch out for a common misperception about cnet timers. You can associate an arbitrary number of different timers with a
single timer event type, even though there are only ten different timer event
types (EV_TIMER1 through EV_TIMER10).
For example, the following code would start three different timers.
CHECK( CNET_set_handler( EV_TIMER5,
on_timer5, 0 ) );
myTimer1 = CNET_start_timer( EV_TIMER5,
1000, 0 );
myTimer2 = CNET_start_timer( EV_TIMER5,
3000, 0 );
myTimer3 = CNET_start_timer( EV_TIMER5,
5000, 0 );
One, three, and five seconds later, the event
handler on_timer5 would get
called. To determine which timer had
expired, you would compare the on_timer5’s
second parameter (timer) with myTimer1, myTimer2, and myTimer3.
·
The
CHECK macro is defined in cnet.h, and is a convenient way to
handle error conditions that occur in the cnet
functions. Suppose, for example, that
our CNET_set_handler call above were
to fail for some reason. Then CHECK would open a window and print a
message describing the type of error that had occurred and the line number of
the CNET_set_handler call that caused
the error. (If you use the –W
command-line flag to run cnet in text-only
mode, CHECK prints its error message
and then exits the simulation. If you
don’t want a failed function call to cause your simulation to stop, then don’t
use CHECK.)
·
Finally,
look at on_timer. Here, we simply print another greeting and
restart the timer, thus encouraging each node to announce its presence at five
second intervals, indefinitely.
3.5 Adding keyboard and debug events
When
you run the graphical user interface to cnet,
you can interact with your protocols through two kinds of user-generated
events—EV_KEYBOARDREADY, which occurs when you type a line of text, and
EV_DEBUG1,…, EV_DEBUG5, which occur when you click on the corresponding debug
buttons.
To
add event handlers for EV_KEYBOARDREADY and EV_DEBUG1, do as we did for
EV_TIMER1—add a CNET_set_handler call
to reboot_node for each event type,
add a call to CNET_set_debug_string
to reboot_node to set the text that
will appear on the Debug button, and write the event handlers themselves. Here are a pair of event handlers that, in
the spirit of [hello.c] do no meaningful work.
void on_keyboard( CnetEvent event,
CnetTimer timer, CnetData data )
{
char buffer[100];
int bufferLength = 100;
CHECK(
CNET_read_keyboard( buffer, &bufferLength ) );
printf( "You just typed
'%s'.\n", buffer );
}
void on_debug1( CnetEvent event,
CnetTimer timer, CnetData data )
{
printf( "Hey! Stop pushing that
debug button!\n" );
}
Try
them out (don’t forget to set the event handlers in reboot_node). When you run
the simulation, open one or more of the node windows. In each node window, a button with your button text (from the CNET_set_debug_string call) will
appear. If you click on the debug
button, your debugging message should appear in that node’s window. Also, you can type in each node’s window. Once you hit the enter key, the message from
on_keyboard should appear.
3.6 Exercises
1.
Keep
the printf greeting in reboot_node, but add a couple of
greetings, one sent to standard output and another to standard error using the fprintf function. For example,
fprintf(
stdout, “Hello to stdout\n” );
fprintf(
stderr, “Hello to stderr\n” );
Where do the three different greetings appear on
screen?
2.
Try
running the second version of HELLO in text-only mode by executing the command
cnet
–W –s HELLO
The –W flag tells cnet to run in text-only mode, and the –s flag tells it to print a
summary of events and the network’s activity once the simulation ends.
By default, the simulation will run for three
minutes, real-time (and simulated time as well). A reasonable person would probably choose to put this HELLO
network out of its misery early by interrupting it with a CTRL-C before the
three minutes are up. Even then, a
summary will be printed.
If you would like cnet to simulate 20 minutes of network activity without taking 20
minutes of real time, you can use the –T flag to tell cnet to ignore real time and simulate the network as fast as
possible, and the –M flag to specify 20 minutes, like so:
cnet –W –T –M 20 –s HELLO
Note that the summary reports simulated time in
milliseconds.
3.
Look
at the definition of the CnetNodeinfo
type in [cnet.h] or the cnet
documentation. Use this information and nodeinfo
to print out as much information about each node as possible in response to a
debug event.
4.
Add
the following lines to the top of HELLO:
nodemtbf = 1200000ms
nodemttr
= 600000ms
These node attributes refer to the “mean time
between failures” and “mean time to repair,” both expressed in milliseconds
(you can also express time in seconds, as in “nodemtbf = 1200s”). By making the above assignments, your nodes
will crash on average once every twenty minutes of simulation time, and will
take an average of ten minutes to
reboot after crashing. Try running the
original [hello.c] simulation for an hour (use –T and –M for this one). You can print out the value of nodeinfo.time_in_ms to see when reboot_node gets called.
5.
In
the version of [hello.c] where each node prints a greeting every five seconds,
add a handler for EV_KEYBOARDREADY that replaces the node’s greeting with
whatever the user has typed. Add a
handler for EV_DEBUG1 to print out the node’s greeting whenever the Debug1
button is pressed.
4.
Example:
The best of all possible data link layers
In
Section 3, our simulation did lots of different things, but it didn’t actually
send any messages from node to node.
Though many network security problems would be solved by preventing
hosts from sending information to one another, it is likely that you will want
to model less secure yet more communicative kinds of networks. In this section, we will let our nodes talk
to each other.
For
simplicity, let’s work with a two-node network:
compile = "boapdll.c"
host Eden
{
link to Shangrila
}
host Shangrila
{
east of Eden
link to Eden
}
The goal of our data link layer will be to accept messages from the application layer on the sending node and deliver them, uncorrupted and in the proper order, to the application layer on the receiving node.
For
this example, we will assume that the physical layer neither loses nor corrupts
frames. Unrealistic though this
assumption may be, cnet is willing to
humor us, and so we will end up with very simple code. In fact, our strategy doesn’t have to be any
more complicated than this:
·
When
the application layer has a message to send, send it via the physical layer on
link number 1 (the only outgoing link).
·
When
the physical layer receives a message on an incoming link (number 1 again),
send it up to the application layer.
This strategy will require us to write three event handlers—one each for EV_REBOOT, EV_APPLICATIONREADY, and EV_PHYSICALREADY. We can use a Frame data type that includes no header information—just the raw data—since the frames are guaranteed to arrive at their destination intact and in order.
4.1 The code
We will now take a look at an implementation of our data link strategy. A complete version of the code is available in [BOAPDLL], [boapdll.h], and [boapdll.c].
4.1.1 The Frame data type
To send our messages, will use a Frame data type defined like so:
typedef struct
{
char info[MAX_MESSAGE_SIZE];
} Frame;
#define FRAME_HEADER_SIZE (sizeof(Frame)-MAX_MESSAGE_SIZE)
The constant MAX_MESSAGE_SIZE is defined as 8192 (8K) in cnet.h. The application layer, by default, will generate no messages larger than MAX_MESSAGE_SIZE bytes.
The Frame type and FRAME_HEADER_SIZE (which is a synonym for zero) may seem a bit foolish in the present context, but we are laying the groundwork for more complicated data link protocols where we will need a non-empty frame header.
4.1.2
The
EV_REBOOT handler
The
event handler reboot_node needs to
register the event handlers for EV_APPLICATIONREADY and EV_PHYSICALREADY
events, and it needs to tell the application layer to start generating
messages.
void reboot_node( CnetEvent event, CnetTimer timer, CnetData data )
{
CHECK( CNET_set_handler( EV_APPLICATIONREADY, on_app_ready, 0 ) );
CHECK( CNET_set_handler( EV_PHYSICALREADY, on_phys_ready, 0 ) );
CHECK( CNET_enable_application( ALLNODES ) );
}
See
the cnet documentation for a
description of the parameters of CNET_set_handler
and CNET_enable_application.
Don’t
forget that each node’s copy of reboot_node
will be called once. Thus, both nodes
will enable their application layers, and so both nodes will act as
senders. If you want to make one of the
nodes a sender and the other a receiver (this can be an easier situation to
understand at first), you can call CNET_enable_application
only for node 0:
if(
nodeinfo.nodenumber == 0 )
CHECK(
CNET_enable_application( ALLNODES ) );
4.1.3
The
EV_APPLICATIONREADY handler
Every
event handler takes three parameters.
The first is the type of event being handled. If every event type has its own handler, then the event parameter is redundant. But if you want a single function to handle
more than one type of event (e.g. all the EV_DEBUG types of events), event will help you tell which event has
occurred.
The
second parameter is used in the case of
EV_TIMER events to pass the ID
of the expired timer. This
parameter is irrelevant for most event handlers, but by making all handlers
take the same parameter types, cnet
keeps things simpler than they would otherwise be.
The
third parameter, data, is determined
at the time of the CNET_set_handler
call. Whatever value was passed as the
third parameter to CNET_set_handler
will be sent along as data whenever
the handler gets called.
When
the application layer generates a message, it calls on_app_ready, since that’s the function specified in the CNET_set_handler( EV_APPLICATIONREADY,…)
call in reboot_node. The job of on_app_ready is to accept the new message explicitly and then send
it off to the physical layer.
void on_app_ready( CnetEvent event, CnetTimer timer, CnetData data )
{
CnetAddr destAddr;
Frame frame;
int frameLength;
int messageLength;
/* Get the message from the application layer. */
messageLength = MAX_MESSAGE_SIZE;
CHECK( CNET_read_application( &destAddr, frame.info, &messageLength ) );
/* Send the frame to the physical layer. */
frameLength = FRAME_HEADER_SIZE + messageLength;
CHECK( CNET_write_physical_reliable( 1, (char *)(&frame), &frameLength ) );
}
Our
assumption of a perfect transmission medium is implemented here, where we use CNET_write_physical_reliable instead of CNET_write_physical. Note that this assumption and the two-node
network make on_app_ready a lot
simpler than it would be otherwise.
Since there can only be one destination address, the value placed by CNET_read_application in destAddr can be ignored. Further, since the only destination node is
guaranteed to be on the other end of link 1, no special link-identifying work
needs to precede the CNET_write_physical_reliable
call.
4.1.4 The EV_PHYSICALREADY handler
When
a frame arrives from our perfect physical layer, we can feel confident about
passing the message directly to the application layer.
void on_phys_ready( CnetEvent event, CnetTimer timer, CnetData data )
{
Frame frame;
int link;
int frameLength;
int messageLength;
/* Get the frame from the physical layer. */
frameLength = sizeof( Frame );
CHECK( CNET_read_physical( &link, (char *)(&frame), &frameLength ) );
/* Send the message to the application layer. */
messageLength = frameLength - FRAME_HEADER_SIZE;
CHECK( CNET_write_application( frame.info, &messageLength ) );
}
4.2 Exercises
1.
Try
running the Best of All Possible Data Link Layers. Take a look at the statistics window during the simulation, or
use the –s flag to get an end-of-run report.
Note in particular the efficiency value. This measures the ratio of the total number of message bytes generated by all application layers to the number of bytes transmitted over the physical layer. Since our Frame type has no header fields, we send exactly the same number of bytes to the physical layer as are given to us by the application layer. So why is the efficiency less than 100%?
Study the statistics carefully to make sure you understand what they are all about. Do the values make sense for this simulation?
2.
See
what happens if you add the following lines to the top of the topology file and
rerun the simulation.
propagationdelay
= 500ms
messagerate
= 1000ms
These node attribute assignments say that frames should take 500 milliseconds to cross from one node to the other, and that on average, each application layer will generate one message every second.
Now drop messagerate lower. What happens when messagerate gets smaller than propagationdelay? What happens when messagerate gets a lot smaller than propagationdelay?
3.
Now
let’s enter a more real world, setting
probframecorrupt
= 3
or
probframeloss
= 4
or both. The first instructs cnet to damage about one out of every eight frames transmitted over the physical layer (the 3 here is cnet’s shorthand for 1 / 2^3). The second makes cnet lose about one out of every sixteen frames completely.
To make these errors occur, you’ll also need to change the CNET_write_physical_reliable call in on_app_ready to a CNET_write_physical call.
When you try this new error-prone protocol, you’ll discover that the simulation complains as soon as a bad message is passed up to the application layer. Take a look at this error message, and also at the statistics report at the end of the run.
5. Example:
A Stop-and-Wait Data Link Protocol
The files [STOPANDWAIT], [stopandwait.h], and [stopandwait.c] contain an implementation of a stop-and-wait data link protocol, similar to that described in section 7.1 of Stallings. By using CNET_write_physical, we give permission to cnet to introduce errors into our transmissions. To deal with these errors, the stop-and-wait protocol:
·
includes
a checksum in each frame,
·
sends
an acknowledgement from receiver to sender after each successfully received
frame,
·
and
sets a timer after each transmission to ensure that the sender will resend the
frame if the acknowledgement never arrives.
As you read the stop-and-wait code, there are a few things you will see.
·
The
checksum is computed using one of the checksum functions provided by cnet.
If you want to try your own checksum algorithm, write your own function.
·
The
checksum is stored in the header, so it’s important to set the checksum field
to a fixed value (this implementation uses 0) before computing the checksum for
the frame. It is also important for the
receiver to set the checksum aside and reset the checksum field to 0 before
recomputing the checksum to determine whether the frame has arrived
uncorrupted.
·
The
acknowledgement timer is set to 3*linkinfo[1].propagationdelay (see cnet.h and the cnet documentation for details on linkinfo). This works fine
if the receiver’s frame-processing time is less than a one-way trip between
nodes. If the frame-processing time is
a lot less than a one-way trip, however, this leads to a much slower protocol
than is necessary.
5.1 Exercises
1.
Run
the stop-and-wait simulation as it is, and take a look at the end-of-run
statistics. Modify the probframecorrupt and propagationdelay attributes and see how
they affect the efficiency of the protocol.
Try collecting efficiency data and plotting it as a function of probframecorrupt. Does efficiency seem to vary linearly with probframecorrupt or is the relationship
more complicated?
2.
Arrange
for the acknowledgement timer to expire before the acknowledgement has time to
return even if the frame being acknowledged arrived uncorrupted. Do you expect the protocol to continue to
function under these conditions? If so,
by how much would you expect the efficiency to drop? Test your hypotheses.
6.
Example: Hot Potato Routing
As soon as you allow your network to have more than two nodes, nodes will have to make routing decisions. That is, given a packet and its destination address, to which outgoing link should the packet be written?
One of the simplest and most aesthetically pleasing routing algorithms is hot potato or random routing (see section 10.2 of Stallings). When a packet arrives at a node, the node either keeps the packet (if the packet is addressed to the node) or sends it out on a randomly chosen link.
Try running [hotpotato.c], which can be used with any topology file (e.g. [HOTPOTATO]). In this simulation, node 0 sends a single message, after which no more messages are generated. The fprintf statements are arranged to allow you to watch the path taken by this single message as it bounces around on its way to its destination.
If you have worked through the examples in sections 3-5 above, most of the code in [hotpotato.c] should be self-explanatory. However, there are a few ideas worth mentioning:
·
Because
we are working in the network layer, we need some kind of data link layer
between our routing code and the physical layer. We could retain the stop-and-wait code from the previous section,
but for simplicity’s sake, we have chosen to use CNET_write_physical_reliable as our downward interface to the data
link layer. This makes sense especially
if we view a link’s propagation delay as the average time it takes for a frame
to get delivered correctly across the link, including the time for
acknowledgements, resends, etc.
·
Note
that [hotpotato.c] includes functional interfaces to the data link layer from
above (to be called by network layer code) and from below (to be called by
physical layer code). You may view this
as overkill in such a simple example, but the more complicated your protocols
become, the more important it is to preserve the independence of the layers, so
it’s good to get into the habit of doing so.
·
For
the first time, we are paying attention to the address returned by CNET_read_application. Without it, we would not be able to deliver
the message to the correct node.
·
The
Packet data type includes a hopCount field that is used in this
program only for reporting purposes.
This hop count could also be used to prevent a packet addressed to an
invalid destination from being passed from hand to hand indefinitely.
6.1
Exercises
1. The [hotpotato.c] code disables the application layer after sending the one and only message from node 0. Remove the CNET_disable_application call. Try running the simulation for a long time (don’t forget the –T and –M command line flags). What happens? How could you fix the problem?
2. The code in [hotpotato.c] chooses each of its outgoing links with equal probability. Try to come up with a way for each node to collect some simple statistics about the packets passing through, and to use those statistics to choose better link probabilities. (You can tell whether the new link probabilities are better by keeping track of the average hop count from source to destination, and the efficiency reported by cnet.)
3. One of the strengths of hot potato routing is its adaptivity. To watch this adaptivity in action, first set messagerate to a high enough value to allow each packet to arrive at its destination before the next packet is sent, thus avoiding the problem discussed in question 1 above. Then, choose a link in your topology whose failure would not disconnect any nodes from the network. Set that link’s linkmtbf and linkmttr to values that will allow you to watch packets routing around the bad link (you should set linkmttr to at least double messagerate so you’ll have time to see more than one message avoid the bad link). What changes do you need to make to [hotpotato.c] to keep routing functioning properly? Try it.
7.
Higher
Layer Protocols
When we implemented a routing algorithm in the previous section, we didn’t want to be bothered with worrying about the data link layer, so we used CNET_write_physical_reliable as a stand-in for a reliable data link layer. If you want to implement protocols in the presentation, session, or transport layers without worrying about routing, you can use CNET_write_physical_direct in much the same way.
8.
Project
Ideas
This section contains a few ideas for student projects using cnet. These idea descriptions are not intended as complete assignments (they’re a bit too open-ended for most contexts), but as starting points from which project assignments could be designed.
8.1 Neighbor discovery
One
of the many tricky problems that concerns the network layer is the problem of neighbor discovery (also known as neighbor reachability). At startup, a node needs to discover which
node, if any, is at the other end of each of its links. As time passes, the node also needs to keep
track of which of its neighbors still exist, and whether any new nodes have
joined the neighborhood.
For
this project, you should devise and implement a neighbor discovery protocol.
As
a first test of your implementation, use a debug event to generate a current
list of the specified node’s neighbors
and the links they’re attached to. Make
sure that within a few seconds of startup, each node has an accurate list of
its neighbors.
Once
the initial discovery of neighbors is working, change the linkmtbf and linkmttr
link attributes globally in your topology file. Watch to see how quickly the neighbor lists recover after each
link fails or comes back up.
8.2 Stop and wait for a 4-node fully connected network
The
data link protocols described in sections 4 and 5 above assumed a two-node
network. Each node was attached to its
partner’s link 1. In a more general
situation, however, a node may have many neighbors, and will need to maintain
data links with each of them.
For
this project, extend the stop-and-wait protocol from Section 5 to work for a
4-node network in which each node is linked to every other node. One of the hard parts of this project is
determining which link to send a packet out on. You may wish to use a neighbor discovery method like the one in
project 8.1, or you may choose to hard-code the correspondence between link
number and node address.
Compare
the efficiency of your 4-node stop-and-wait with that of the 2-node
stop-and-wait of Section 5.
8.3 Stop-and-wait with piggybacked
acknowledgements
Every
frame sent across a link takes up bandwidth on the link, and interrupts the
operating system on the receiving machine.
As a result, it is good to reduce the total number of frames sent.
When
the stop-and-wait protocol discussed in section 5 is running in duplex mode
(that is, both nodes are acting as sender and receiver), data and
acknowledgement frames are traveling in both directions across the link. To reduce the number of frames sent, we
could package each acknowledgement with a data frame, thus serving two purposes
with a single frame. This piggybacking of acknowledgements makes a
data link protocol a bit more complicated, but it pays back with improved
efficiency.
For
this project, you should modify [stopandwait.c] to use piggybacked
acknowledgements. This will require you
to write code to arrange for the following:
·
When
the receiver would normally send an acknowledgement, it starts a piggyback
timer instead.
·
If
the piggyback timer goes off before a data frame is ready (that is, before the
next EV_APPLICATIONREADY event), the receiver should send the acknowledgement
alone.
·
Whenever
a data frame is ready, the current piggyback timer (if any) should be stopped,
and the most recently received frame should be acknowledged in the data frame.
For more discussion of piggybacking, see section 7.1 of Stallings.
8.4 Sliding windows
Implement
the go-back-n and/or selective reject (also known as selective repeat) protocols discussed in
section 7.3 of Stallings. If you
implement both (or if, say, half the class implements one and half the class
the other), collect statistics comparing the efficiencies and average delivery
times for your stop-and-wait, go-back-n, and selective reject implementations
for a variety of error rates, window sizes, and propagation delays. Which protocol would be best for a low-error
low-delay line (like fiber optics)?
Which would be best for high-error, high-delay (like satellite
communication)?
8.5 Putting data link and network layers
together
When
we looked at hot potato routing in section 6 above, we used CNET_write_physical_reliable to avoid
having to concentrate on data link layer concerns when we were really
interested in the network layer. But
there comes a time when you have to put the pieces together. For this project, take a working
implementation of a reliable data link protocol (for example, the stop-and-wait
protocol from section 5) and a working implementation of a routing protocol
(hot potato or otherwise) and put them together in a single program.
It’s
not really enough here to get the two pieces of code to work together. You should also take care to separate the
data link code from the routing code (ideally, you would have a separate header
and source file for each layer), and to provide clear functional interfaces
through which all inter-layer communication will pass. The code in [hotpotato.c] is a start in the
right direction, with its down_to_data_link,
up_to_data_link, and up_to_network functions.
8.6 A connection-oriented transport layer
protocol
Implement
a transport layer protocol for connection-oriented service. Your transport layer should provide higher
layers the ability to:
·
initiate
a connection to a remote host, given that host’s address,
·
read
from the connection,
·
write
to the connection, and
·
close
the connection.
Assume
that between any two nodes there will be at most one active connection at any
time (thus there will be no need for a system like the TCP/IP notion of a port).
Use
CNET_write_physical_direct to provide
network and data link layers below your code.
Once you get your transport layer working, you might wish to combine it
with your own network and data link layer code, as in project 8.5.
8.7 Distance vector routing
Implement
a distance vector routing algorithm.
The original Routing Information
Protocol (RFC 1058, “Routing Information Protocol,” C. Hedrick) would be a
good model to follow, since it is already relatively simple as these things go,
and can be simplified further for a cnet
project.
For
more information about distance vector algorithms, see Interconnections: Bridges, Routers, Switches, and Internetworking
Protocols, by Radia Perlman, Addison-Wesley, 1999.
8.8 Traceroute
Write
a handler for EV_KEYBOARDREADY to accept commands from the user. Implement a traceroute command to report what route is taken by a packet sent
from one node (specified by address) to another. Naturally, this assumes that you already have a functioning
routing implementation.
8.9 Name resolution
Using
your command interface from the Traceroute project, implement a name-to-address
resolution command. The user should be
able to type the name of a node on the network and receive the address of the
node in return. You may find the
ability to broadcast messages to the whole network useful. You can write your own broadcast code (e.g.
via a flooding algorithm), or you can send BROADCAST
as the first parameter to CNET_write_direct.
8.10 Flooding
The
cnet program [flood.c] implements a very simple-minded flooding
algorithm. There is a globally defined maximum hop count. Whenever a node
receives a frame, it increments the frame's hop count. If the resulting hop
count is greater than or equal to the maximum, the node discards the frame.
Otherwise, the node sends a copy of the frame to all its neighbors.
This
implementation tests its algorithm by allowing node 0 to flood a single frame,
after which no more original frames are sent. When each node receives the frame
for the first time, it saves a copy.
Use
[flood.c], [flood.h], and the topology file [FLOOD] to answer the following
questions.
· Start MAX_HOP_COUNT at 1 and
increase it. As a function of MAX_HOP_COUNT, which nodes receive a copy of the
frame and which don't?
· Modify the code to report
the time at which the last copy of the frame is discarded. Now start
MAX_HOP_COUNT at 1 and increase it (try going up to 8). For each value of
MAX_HOP_COUNT, record the total number of frames sent (the -s command-line
argument to cnet will tell you this) and the time it takes for the flood to
subside. Discuss the apparent growth rates of these quantities as a function of
MAX_HOP_COUNT.
· Modify the code so that when
a node receives a frame from a neighbor, it does not flood a copy back to that
neighbor. Collect the same statistics as in the previous question, and discuss
the effect of your change to the algorithm.
· Keep the code change from
the previous question. Modify the Frame data type to include a sequence number
field that will store a sequence number between 0 and 63. Modify the code so that a node will only
flood an incoming frame if (1) the incoming frame's hop count isn't too high,
and (2) the incoming frame's sequence number is "greater" than the
sequence number the node has previously stored, as defined by the following
function.
int
greater_than( int m, int n )
{
return(
(m > n && m - n <= 32 )
|| (m < n &&
n - m >= 32) );
}
Initialize the “previously stored” frame at each
node to have sequence number 63 before letting node 0 flood a frame with
sequence number 0. Then, collect time
and frame count statistics as MAX_HOP_COUNT increases. How does this algorithm
compare to the previous versions? How does it compare to the minimum possible
time and frame count?
· Flooding combined with a
circular sequence number space can lead to trouble. Using the most recent version of the flooding code, have node 0
flood three frames with sequence numbers 8, 40, and 44, without pausing. What
happens? Why?
8.11 The ARPANET incident of October 27, 1980
RFC 789, “Vulnerabilities of network control protocols: an example,” by E. C. Rosen, describes an “unusual occurrence” on October 27, 1980, during which the ARPANET was practically unusable for several hours. Once everything was sorted out, this incident revealed a small weakness of the link state routing protocol used in the ARPANET at the time. This weakness required a freakish set of circumstances to exploit, and is described in detail in RFC 789.
For
this project, try to replicate the events of the ARPANET incident. This will require you to implement a version
of the ARPANET routing protocol of 1980, which is described in “The New Routing Algorithm
for the ARPANET,” IEEE Transactions on
Communications, May 1980, J.M. McQuillan, I. Richer, E.C. Rosen.
You
can make significant simplifications without losing the essential trouble with
the ARPANET routing algorithm. Indeed,
the flooding exercise 8.9 has distilled things down about as far as they will
go—flooding and circular sequence number spaces don’t mix well. Still, implementing the complete ARPANET
routing algorithm in cnet would be an
excellent and challenging exercise.